Managing Buttons
When buttons are added to shared or local panels, their properties can be configured to update various attributes. This page explains the process of managing button properties
Managing Buttons Topics
Right Click Options
When a button has been added to a shared or local panel right clicking enables the following options either by:
-
Right Clicking on a Single Button
-
Control+Clicking on Multiple Buttons
-
Change Colour
-
Apply Security
-
Change Font Size Large or Small
-
Change Text Colour to White
-
Change Text Colour to Grey
-
Change Text Colour to Black
-
Sort Buttons (when multiple selected)
This function works when buttons are added left to right and will when all buttons selected sort them in alphabetical order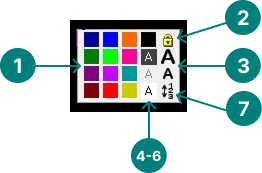
Double Click Options
When a button has been added to a shared or local panel double clicking enables the following options:
-
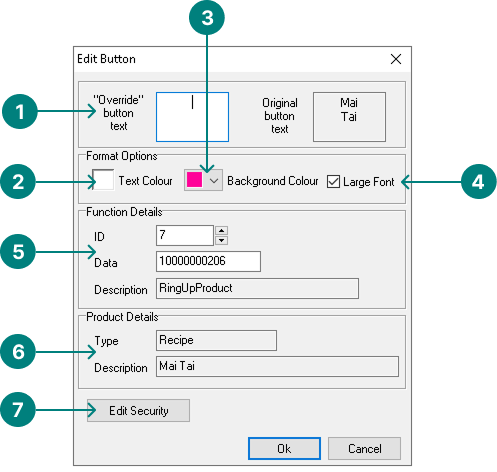
Override Button Text
The original text entered in the Product Modelling can be changed here to have more characters -
Text Colour
-
Background Colour
-
Large Font (if checked)
-
Functional Details - when a product is added the Entity Code is displayed
When functional buttons are added their system ID is displayed -
Product Details
-
Product Type - Standard Line / Recipe / Instruction
-
Product Description
-
-
Edit Security
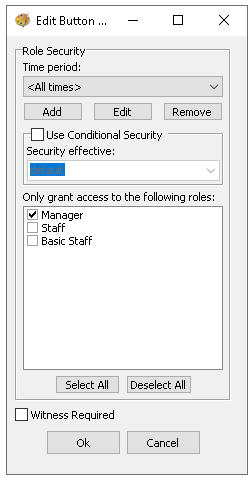
Security Settings
Follow these steps to apply security settings to buttons:
Role Based Security
-
Right click or double click on a button and choose the security option
-
Deselect Job Roles that are not able to perform the function or sell a selected product
-
Click OK
Time Based Security
Time based security can be used in conjunction with role base security.
Example A - I only want senior team members to access the session change after 21:00, before that time it cannot be used by any role
Example B - I only want Sunday Lunch product to be sold on Sundays
-
Right click or double click on a button and choose the security option
-
Click Add
-
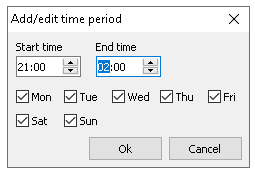
Set the Start and Time of the security period
-
Select the required Days that the security period applies
-
Click OK
-
Adjust the Job Roles that can access the button during the time period
-
Additional time periods can be added to meet the requirements of the organisation where different roles can access the button at different day and times
The start and end times could be different on selected days
Other Options
Conditional Security
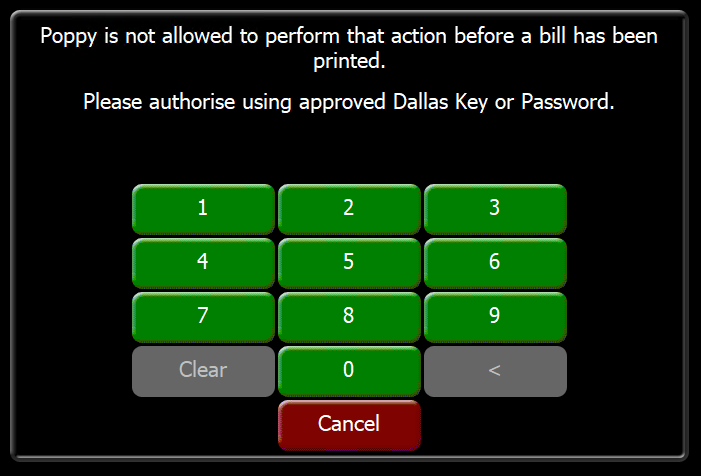
Conditional security can be applied to buttons to control their behaviour based on whether a bill has been printed or not.
Follow these steps to enable conditional security:
Print Bill First
-
Set the check box for Use Conditional Security
-
Ensure Default is selected from the drop down
-
Deselect Job Roles that are not able to perform the function or sell a selected product until the bill is printed
The POS operator who's role is not selected will be prompted to print the bill before being able to use this function or product.
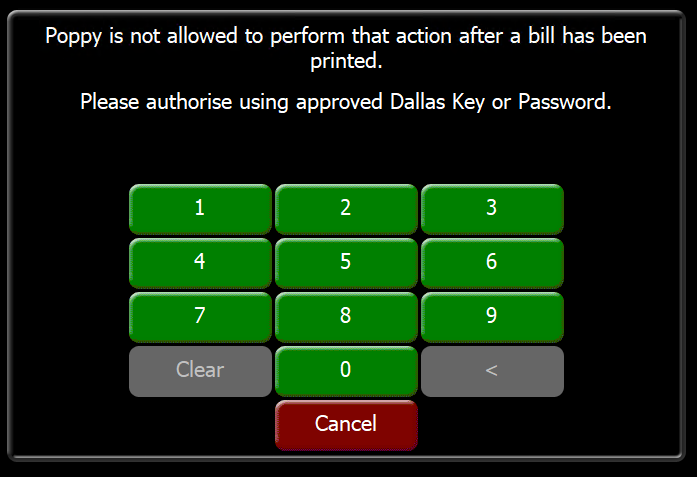
Apply After First Bill Print
-
Set the check box for Use Conditional Security
-
Ensure After the first bill print is selected from the drop down
-
Deselect Job Roles that are not able to perform the function or sell a selected product until the bill is printed
When using this option ensure the 'Default' job roles are set to enabled otherwise POS operators will not be able to use the function or product
The POS operator who's role is not selected will be able to use the function or product but after the first bill print the button will be locked with security applied
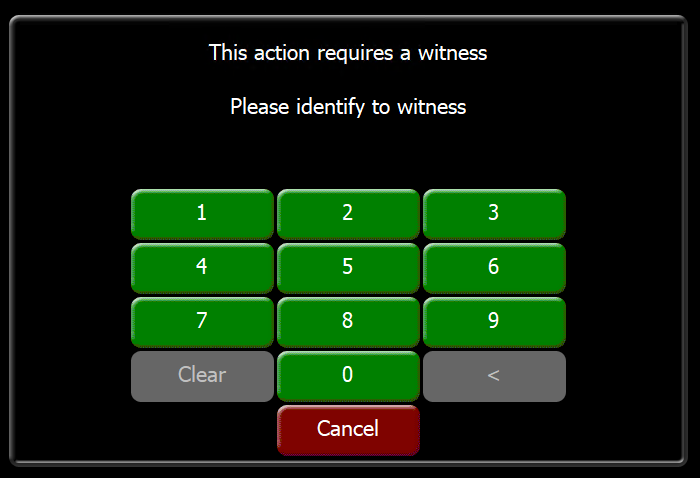
Witness Required
Selecting the Witness Required enables any selected job roles to perform a given function but will require another person with the same available jobs to witness the function being completed.